Advanced Custom Fields And Your Website
There are many different ways to build a website, especially when your site is powered by WordPress. For web developers, a common tool is a plugin called Advanced Custom Fields. Advanced Custom Fields is one of the most trusted tools developers use to build with WordPress.
In this article we will go over what Advanced Custom Fields is, the many types of fields that are offered by the plugin, as well as an example of displaying field data on your site. Let’s jump in!
What is ACF and how can I use it for my WordPress site?
Advanced Custom Fields, put simply, is a tool that is used to create layouts for your WordPress site. The general functionality is as follows: selecting fields from the WordPress admin, choosing where you want those fields to appear in the backend (so users can enter content), and then implementing the visual layer for that content.
Below is a list of some of the field types that ACF offers (as well as many more).
- Text
- Text Area
- Range slider
- Button Group
- Checkbox
- Radio Button
- Select
- True/False
- File
- Gallery
- Image
- oEmbed
- Color Picker
- Google Map
- Time Picker
- Accordion
- Post Object
- Link
To get started using ACF, you have a couple options:
- Download and install the free version from the WordPress repository
- Purchase the Pro version and install that on your site
If you are new to ACF and just want to try it out, going the free route is perfect. With the free version, you have access to over 30 field types!
With the Pro version, you can assign fields to custom Options Pages, use Repeater fields to allow repeatable rows of sub fields, access to ACF blocks in the Block editor and much more!
Whether you choose the free or pro version, this article will give you a better understanding of how to start creating with Advanced Custom Fields!
Creating your first ACF field
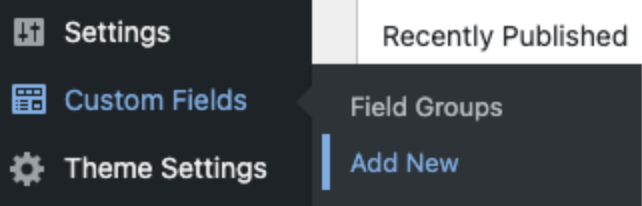
Once you have chosen your flavor of the plugin and it is installed/activated, simply navigate to the “Add New” field group screen to start creating fields.
You can find the “Add New” link by hovering your mouse over “Custom Fields” in your WordPress admin navigation sidebar and selecting “Add New”.
In the “Add New Field Group” screen, you create a field group by giving it a title, then add a field by clicking the “Add Field” button.
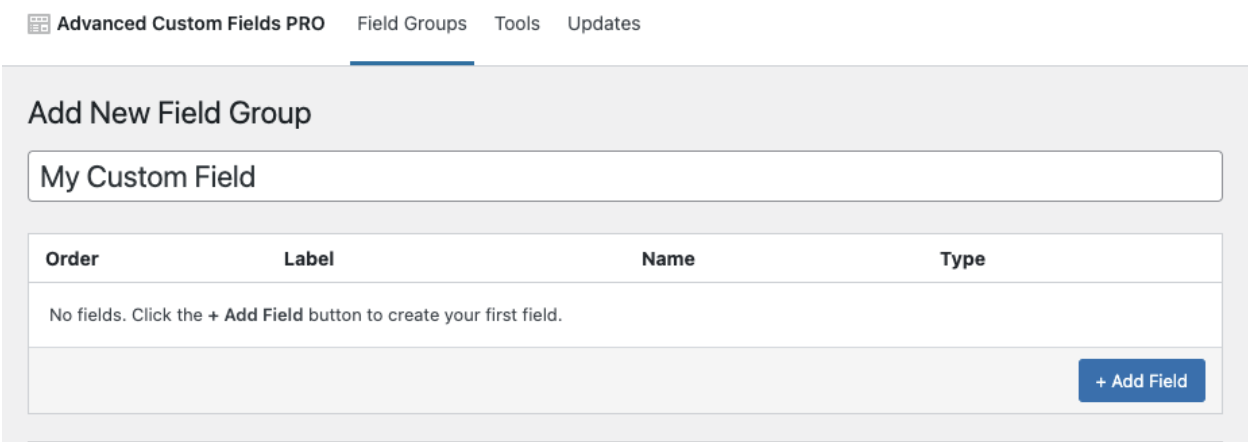
Once you have clicked the “Add Field” button, a new Text field will appear. Give your field a label and then select the type of field you want from the “Field Type” dropdown.
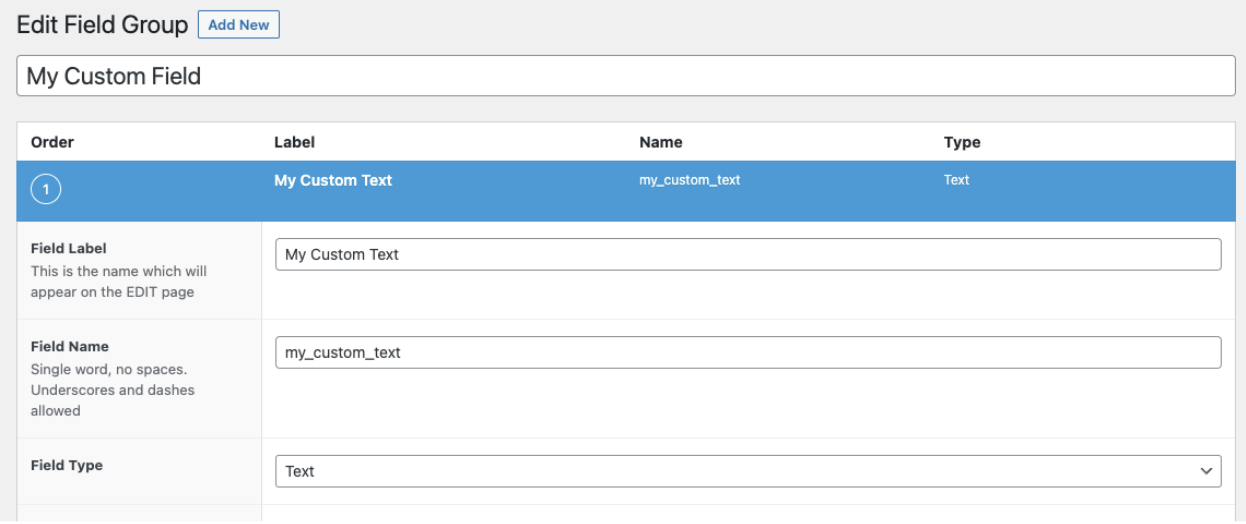
For this example, we are selecting the “Text” field type. You can see that it auto-generates the field name based on your field label. The field name is for referencing the output of the field in your theme or plugin template files, while the label is for visual presentation of the field in the WordPress admin.
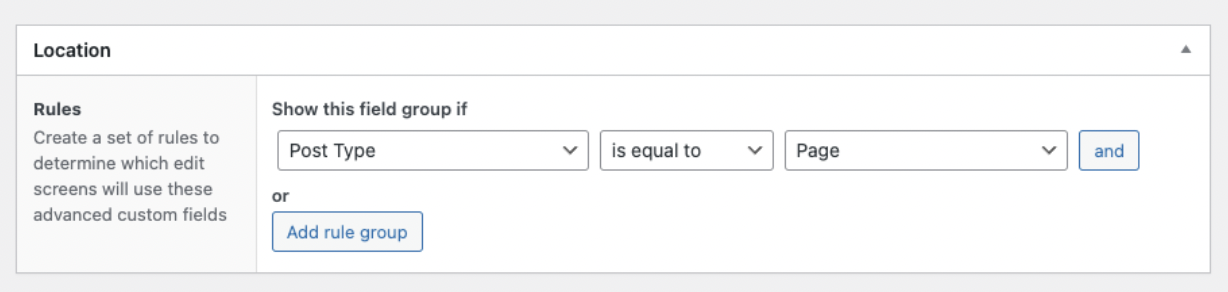
Once you have created and configured your field, you will need to specify where you want it to appear in the backend of your site. For this, let's look at the “Location” panel, which is located below the “fields” panel.
Here we see some conditional rules for where to display our field. You can have your field show on the backend of Posts, Pages, custom post types and much more. For now, we will just select “Show this field group if Post Type > is equal to > Page” to display it while editing a page.
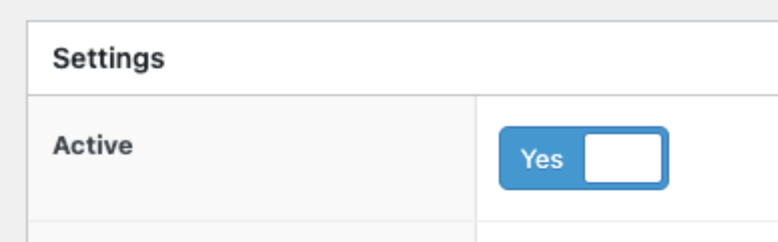
Once you have set the location, you can leave the rest of the options in the Settings panel default and click the “Publish” button. One thing to note, make sure that the “Active” toggle is turned on or you won’t be able to see your field in the backend.
If you ever need to go back to your field, just select the “Field Groups” link from the “Custom Fields” sidebar navigation, and you will see a list of all the ACF field groups on your site. After your new field is created, browse to or create a WordPress page to start using it. You can find either option in the “Pages” link of the WordPress admin sidebar navigation.
Once you are on the edit screen of your page, you can see the field that was created below the text editor box. If you want to hide the text editor box or adjust how your field is displayed, there are a few options in the Settings panel of your field.

Great! We have created our first field, set its location and verified that we can see it in the backend. Now, let’s test it out!
Outputting ACF fields on our site
For this section, we will explore outputting our field data so that we can see it on the front-end of our site.
While there are methods of displaying the output via a page builder (see Elementor, Beaver Builder etc.), for the purpose of this guide we will be outputting our field data via PHP code in a template file. This can be done either in a custom theme or plugin, or a “child theme” using the theme of your choice.
For displaying data from your field, you will first need to figure out what type of field you have. In this example we are using a “Text” field. If you are using another field type, there are code examples for each one at the Advanced Custom Fields website.
For the “Text” field, we can see in the code example here that we simply use the “the_field” function and specify the name of our field.
Below is an example of displaying the field we created earlier.

You can see that the “my_custom_text” part of the function corresponds to the “Name” part of our field that was generated from the label.
Although this is correct and should work properly, a better and more preferred method is to escape the output of our field.
By escaping, we can filter out any malicious code that could be placed in our field. This makes our field more secure and adds a layer of protection to our site in the event that it ever gets hacked and malicious code gets injected into fields from the backend.
WordPress has a few built-in functions for escaping the output of our fields. One of which is called esc_html. All we have to do is wrap our field in the esc_html function and it will securely filter our field. See updated example below.

It is important to note that with the esc_html function, any HTML that is placed in the field will be printed out on the front-end instead of rendered. If you need to include HTML in your field and have it rendered, a better function to use would be the wp_kses function. This function is commonly used when you are working with the ACF WYSIWYG field type since that field has its own internal formatting options that need to be rendered on the front-end of the site.
Once we have our code ready, we will place it in the template file corresponding to the location we set for our field. Since we selected “Page”, we will need to place this code in the “page.php” template file.
Depending on how your theme is set up this may look different for you. In essence, what we are doing is, placing the code in a file that WordPress will use when the Page is being rendered on the front-end.
Please refer to your theme author’s documentation if using a child theme/parent theme situation. If you are using a custom theme, you probably already know where to place this code example.
Now that we have the code in place to render our field data, let's test it out!
Simply add some text in your custom field, publish/update your page and then view your page on the frontend to see if everything is working.
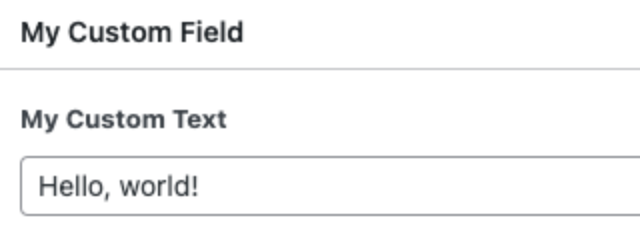
Great! If we did everything right, we should be able to see our text on the front-end of our site.

If you are having issues outputting your field data, make sure you are using the correct method for the type of field you are using. You can find all the information you need in the Documentation section of the ACF website.
Conclusion
Although this is a simple example of using Advanced Custom Fields on your WordPress site, don’t underestimate the power of the tool and what it can create! With their abundance of field types and well written documentation, the possibilities are endless.
For a closer look at ACF and custom post types, be on the lookout for our upcoming posts in this series, “Building A Team Page with ACF and Custom Post Types” or reach out to our team for a personal intro to the tool!